The 5 Steps to a Risk Assessment Explained

Risk assessments are a crucial part of any organisation’s health and safety strategy. Knowing how to carry one out effectively is pivotal for those in positions with health and safety management responsibilities. As a result, how to carry out an effective risk assessment is covered by many health and safety courses and qualifications, such as IOSH Managing Safely and the NEBOSH National General Certificate. In this post, we’ll discuss the five steps to an effective risk assessment, so you can carry them out in your workplace and create a safer environment for you and your colleagues.
What is a Risk Assessment?
A risk assessment is defined as a five step, practical exercise where the assessor identifies hazards in the workplace. These hazards are any item or object, from broken shards of glass to a misplaced broom, that have the potential to cause harm. The level of harm these hazards could cause, and the chance the harm could occur are two factors which, when combined, create the level of risk that the hazard poses to individuals in the workplace.
Risk assessments are a key part of an organisation’s health and safety strategy because they identify hazards which otherwise would have gone unnoticed, providing the opportunity to put control measures in place which reduce the risk these hazards pose and, in doing so, keep workers safe.
How to conduct a health and safety risk assessment
The five steps of a risk assessment involve the following:
Identifying hazards.
Assess the risks.
Implement control measures
Monitor and review the measures.
Recording and communicate findings to ensure ongoing safety.
We'll now go through each step so you know what is required of the risk assessor at each stage.
Step 1: Identify Hazards:
The first step in a risk assessment is to identify and recognise potential hazards or dangers present in a particular situation or environment. When you read the word ‘hazard’ you might first think of dangerous objects such as exposed blades on machinery, or spilled chemicals. However, anything can be a hazard and pose a significant risk, so it's vital the risk assessor stays vigilant during the assessment.
Common types of hazards for various industries include:
Old, untested, or damaged tools that could malfunction during use
Machinery with hot, sharp or moving parts
Scaffolding, ladders, and other equipment necessary for working at height
Exposed cables or wiring
Gas valves, paper waste and other potential fire hazards
Uneven flooring
And many, many more.
It's also vital you consider how a hazard poses a risk, as although boxes of product may block a fire exit, they may also be a risk to those lifting them due to their size or weight. Even everyday items like computers can be considered hazards if proper posture is not observed while working at them.
Because of the many factors at play with hazards, there are three things the risk assessor should document during the first step of a risk assessment. These are:
What the hazard is
Who the hazard could harm
And how the hazard could cause harm
By documenting all of this you can effectively prepare for step 2 and record your risk assessment for colleagues and management to reference, if necessary.
Step 2: Assess the risks
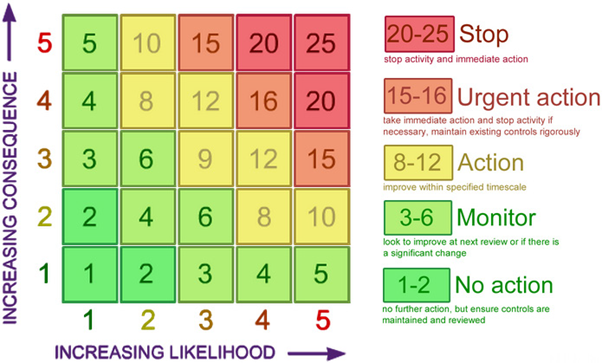
The second step of a risk assessment involves determining the level of risk the hazards you identified pose. As we've already discussed, to calculate the level of risk you must consider two factors: the level of harm the hazard could cause, and the likelihood it could cause harm. Each of these factors is assigned a value, which, when applied to a risk matrix, provides you with a risk level for the hazard. The value you assign to a hazard will depend on the risk matrix you're using. For this blog we'll use a 5 by 5 risk matrix, as shown below.
The value you assign each hazard depends on the severity of the harm it could cause (consequence) or the chance that harm could occur (likelihood), as shown below.
Likelihood:
Almost impossible (yearly+)
Unlikely (yearly)
Possible (monthly)
Likely (weekly)
Almost certain (Daily)
Consequence:
Insignificant (no injury)
Minor (minor injuries need first aid only)
Significant (1-6 days absence)
Major (more than 7 days of absence)
Catastrophic (fatal)
The risk level is calculating by multiplying these two values together, providing you with a number that indicates the action you need to take. Again, using a 5 by 5 risk matrix as an example, the values and associated actions would be as follows:
1-2: No action needed- though ensure all measures are maintained and reviewed.
3-6: Monitor- looking to improve current measures by the time of the next review, or if there is a significant change in the workplace environment.
8-12: Action needed- taken within a specific timescale.
15-16: Urgent action- take immediate action and stop activity if necessary. Maintain existing measures rigorously to ensure no further increase in risk.
20-25: Stop- end the activity and take immediate action.
These actions and values aren’t absolute, so don’t be afraid to do more than what is suggested if you think the hazard poses a significant risk. The assigned values are also useful in prioritising which risks need to be dealt with first, as larger values pose more significant risks.
Step 3: Implement Control Measures
Now you’ve determined what the risks are, and which ones need to be addressed first, you can start considering what control measures you can use to mitigate risk. Control or safety measures are any form of action; whether it be training, the use of new equipment, or the removal of a hazard, which reduces the risk a hazard poses.
These control measures fit into one of five categories, based on how effective they are at reducing the level of risk. The categories are:
Removing the hazard - completely eliminating the hazard removes the risk of it causing any harm.
Reducing the hazard - reducing the amount a hazard has to be interacted with reduces the likelihood of it causing harm.
Preventing contact - if a hazard does not come into contact with anyone, then the level of risk it poses is reduced.
Creating a Safe System Of Work (SSOW) – guidance or training can help workers operate in ways which reduce the risk hazards pose to them, or their exposure to hazards.
Using PPE - personal protective equipment, including gloves, goggles, hard hats, and other such items can be used to reduce the level of harm a hazard could cause, should an incident occur.
It is of course better to remove hazards entirely where possible, however this is not always practical. In these frequent cases you have to select the most effective and practical control measure to reduce the risk a hazard poses.
Step 4: Monitor and Review
Once new control measures are in place you should document them, as well as how you expect they will reduce the risk posed by the hazard. With this noted, you can calculate a second risk based on the hazard with the control measure in place. This second value should be lower than the first and indicates how successful you expect the control measure to be.
Then, when conducting your next risk assessment, you should revisit the risks you documented in the last one. For each you should calculate another risk level using the risk matrix, determining whether the control measures have reduced the level of risk as intended. If the measures have not, repeat the process, devising new ones and predicting how they will reduce risk, returning to them in the next risk assessment. By following these procedures, you can trial and implement control measures until an effective solution is found to reduce a hazard’s risk.
Risk assessments should be conducted periodically in order to ensure this process takes place and measures are reviewed. They should also be performed after incidents or near misses, and when the work environment changes.
Step 5: Communicate and Document
Communication is key during the risk assessment process, as putting new control measures in place will rarely involve only you. Colleagues will need to be informed of the measures and how they will impact daily practices; upper management will need to know in case measures need to be financed; and stakeholders should be informed, as regular risk assessments demonstrate your organisation’s commitment to health and safety.
Documenting risk assessments properly and maintaining records can also help you identify the need for training or more significant safety measures which may be needed across the organisation.
Conducting a Risk Assessment
We've now covered the five key steps involved in conducting a Risk Assessment:
Step 1: Identify Hazards
Step 2: Assess the risks
Step 3: Implement control measures
Step 4: Monitor and review
Step 5: Communicate and document
Using these steps as a guide, you'll be able to conduct an effective risk assessment in your workplace, identifying hazards and reducing the risk they pose to workers. Ensure you document your findings as you go for future reference, as failure to do so will make checking the effectiveness of your control measures difficult.
If you’d like to learn more about conducting an effective risk assessment, our IOSH Managing Safely and NEBOSH General Certificate courses cover it in their curriculums. If you have any questions about the importance of risk assessments or our courses, contact us today.